Looking for image viewer that is capabale of opening multiple images at once

I am looking for an MRI image viewer that is capable of opening multiple images at once. Can anyone recommend one? The idea would be to get a quick overview of the data set to see if there are artifacts in some images. For that, it would be very helpful if all images would be shown side by side and to be able to simultaneously obtain the same slice in the x-y-z-direction for all images.

Currently, I use the Mango Viewer but as far as I am concerned this viewer does not offer such an option. Instead, you can only open individual images in separate windows (which gets quite ‘messy’ for a lot of images) and it also does not offer to simultaneously get the same x-y-z view for multiple images.

I would suggest MRIcroGL. Here are two approaches:

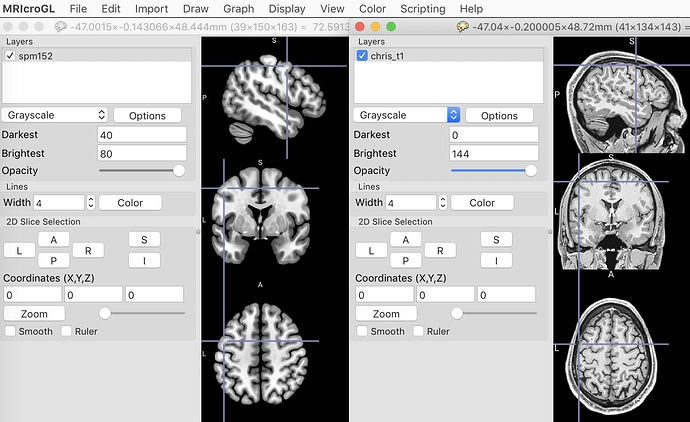
Yoked images (shown below)

  1. Launch MRIcroGL and load your first image.
  2. Select File/NewWindow to launch a new instance of MRIcroGL.
  3. Load your second image into the new instance.
  4. Choose the Display/Yoke menu item. A yoked image will be updated to show the crosshair position of other images. All or none of your images can be yoked to the other images.

Overlay images

  1. Launch MRIcroGL and load your first image.
  2. Choose File/AddOverlay to load your second image on top of the first image.
  3. Use the opacity slider of the Layers panel to adjust the transparency of the overlay, revealing the fit with the image beneath it. Hint: you can also click on the checkbox next to the overlay’s filename in the Layers panel to toggle the overlay from visible to invisible.

The Scripting/Templates menu items showcase a lot of MRIcroGL features, and also show how you can script the tool with Python.

1 Like

Thanks Chris! I’ll try out MRIcroGL :slight_smile:

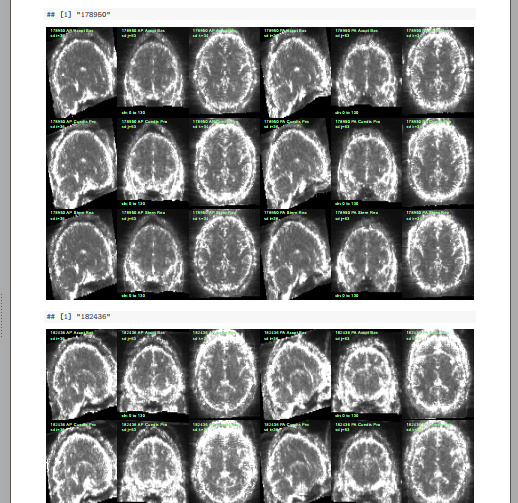
MRIcroGL (and the older MRIcron) work great for interactive checking/comparisons. Static views can be useful, too, for scrolling through many people/runs quickly, storing results, etc. This can be done pretty easily and quickly with knitr (and I’m sure other markdown-type setups/languages). Below is a screen capture of one of our compiled pdfs to give the idea; these are voxelwise standard deviation. The R code calls afni functions to calculate the standard deviations, then plots three slices of each nifti (with a version of my nifti-plotting functions).


(Let me know if you’d like a copy of the R code which made this file.)

1 Like

Cool! I’d like to have the code! You can send me a PM :slight_smile:

I have tried to script your first approach using yoked images, but unless I missed something, there is currently no yokeimages function, right? In that case, this approach would currently not be scriptable?

I looked up the functions at this site:

The page you link is from the old version (1.0). I would suggest you use the current version (1.2). You can see the built-in functions by choosing the Scripting/Templates/help menu item. The Yoke feature is for interactive use by users, to show the same slice in a script, you can explicitly provide the coordinates of interest, for example gl.orthoviewmm(10,0,0) will show a slice that is 10mm to the right of the origin (anterior commissure for normalized images).

1 Like

Hi-

The AFNI viewer can open multiple sets of viewers (as well as both surface- and volumetric views, with SUMA and AFNI, respectively, communicating). For just opening multiple volumes, you can hit the “New” button in AFNI GUI; by default, the sets of images are “locked” together, so that as you scroll through one, you scroll through the other(s).

The AFNI GUI can be “driven” on the command line, so all the file selection, thresholding, colorbars, opacity, location selection, button clicks and more can be passed via scripts, which is useful systematically viewing things.

There is also the handy @chauffeur_afni command, that can setup+take snapshots and movies of data, with some tutorial examples provided here:
https://afni.nimh.nih.gov/pub/dist/doc/htmldoc/tutorials/auto_image/auto_@chauffeur_afni.html
… which is really nice for viewing and flipping through images systematically.

This is what we use for the automated FMRI QC with afni_proc.py:
https://afni.nimh.nih.gov/pub/dist/doc/htmldoc/tutorials/apqc_html/main_toc.html
… as well as much of the integrated QC imaging with TORTOISE for diffusion MRI

–pt

1 Like